
How to Set Center of Gravity on Twisted Hobbys Rc Airplanes
A very common question we are asked of our newer pilots is how to adjust the CG on their rc airplane models. Most all CG (Center of Gravity) location/measurements for each airplane model can be found in our manuals though there can still be confusion in how to set up and fine tune the cg. These recommended CG locations are the starting point for each pilots to use prior their maiden flight. This will give the model its closest to neutral cg allowing an easier flight control for the pilots. Depending on each pilots goal one may choose to set their CG for a more precision style of flight by having a forward cg (nose heavier), or opposite would be tail heaver which can allow for easier 3d movement like hovers and harriers. Moving the models battery or electronics on the aircraft will change the longitudinal or lateral CG. Below we will explain our method that works well to achieve a neutral CG for each of our models and allow you to dial in your model to your liking!
At this moment we must point out one of the keys to success with any rc airplanes/models is to use recommend components the manufacture lists. The will allow the model to achieve desired manufactures
AUW (All Up Weight) as well as correct cg location. If not meet with-in spec's it can effect CG as well as over all flight characteristics of the aircraft. A carefully assembled model that is built straight and true, motor mount thrust angle set to manufactures specs (0 for profile models) is also very important.
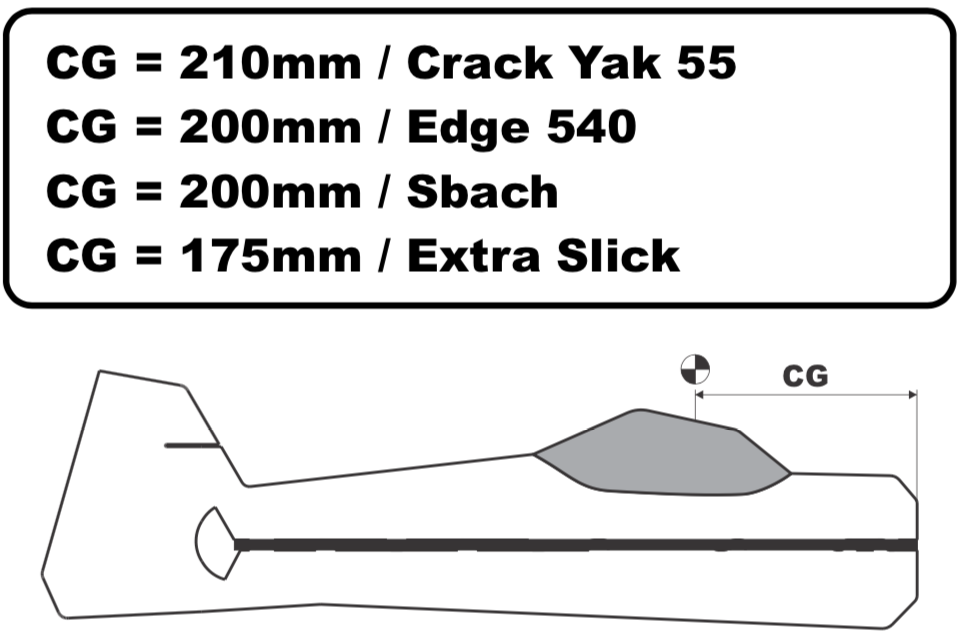
Once model is assembled with all recommended components , CG is set by moving battery with the giving CG measurement location number. This measurement is usually from the nose or the leading edge of the main wing of the model (use reference location per manual). The models manual CG reference location will give you the closest to neutral flight from our testings.
The first maiden of any rc airplane can be tricky and why its important to use the manufacture suggested CG to start with. Once your model has been aileron and rudder are trimmed you can now focus on elevator trim for upright and inverted flight testing. This is done with 3/4 throttle to see which direction the model pitches (nose-up or nose-down). We like to adjust elevator trim in the upright flight position first, once the model is flying level with the earth you can then turn model 180 degree which is call inverted. In this inverted flight position you will now be able to determine if the model pitches toward its nose or tail (toward the sky or down towards the earth). If your model is pitching upward towards the sky in this inverted flight position then your model would be tail heavier and you can then move your battery a little forward, repeat the process over again to test adjustment. The same adjustment would be mode for the opposite condition, if your model pitches toward the earth then your model is nose heavy. Adjust battery location according then repeat process till neutral flight is achieved.
Once you have achieved a neutral cg with your model and its now flying level with the earth in the upright as well as inverted flight position at 3/4 throttle you can now test to see if you have any unwanted up or down thrust angle to your motor mount. This is done by accelerate your model to a higher elevation and then coming straight down to earth with out throttle applied. You will now be able to see which way your model pitches, towards the canopy or to the belly. If there is very little movement and model descents almost straight vertically down we would not suggest shimming motor since the shape of the models themselves are not vertical symmetrical and will create some drag which allow to pitch to one direction. This step is only to verify if there are any major thrust angle issues in which can be noticed during this process. If adjustments are needed add small washers under motor mount and process to test again.
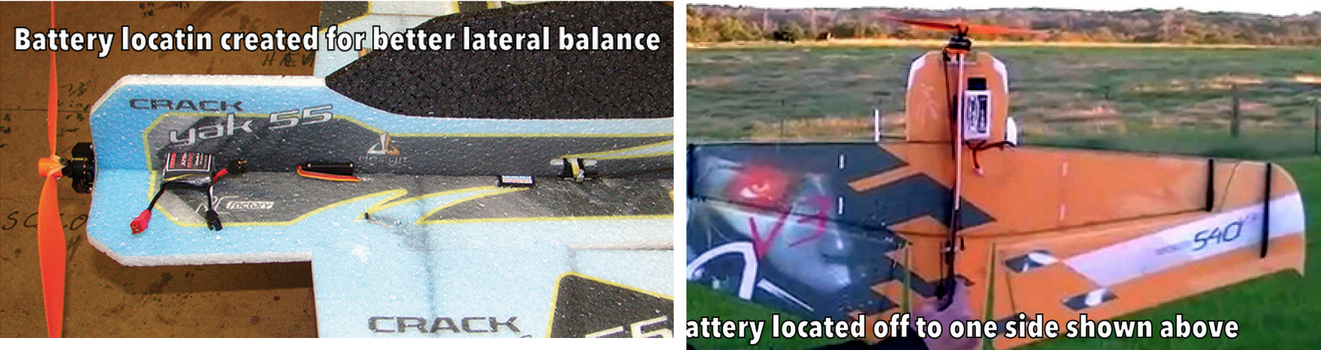
The last CG adjustment is called the lateral balancing and is usually over looked and not usually requiring adjustments. We recommend locating your esc and receiver as close to the center of the model as possible since this we aid in a more evenly lateral balance aircraft. A quick test would be to pick your model up by the motors propeller and tail (be care not to damage anything). If your model lean or rotates to one side and not the other, most likely there is more weight to one side and not the other. This also goes for attaching the battery too!
You can see below some pilots like to cut battery slots in the horizontal fuse which tightly holds the battery in place all while keeping the lateral balance in check. This does not need to be done though it will give a better lateral balance.
Key notes:
- 1) Model build must be straight and components much be in spec with manufacture recommendations.
- 2) Find starting point cg location via manufacture manual by adjusting battery location forward or aft.
- 3) Maiden flight, adjust ailerons and rudder first.
- 4) Adjust elevator trim at 3/4 throttle so model fly's level with the earth.
- 5) Rotate model (inverted flight) and repeat process at 3/4 throttle.
- 6) If model pitches to the ground or sky model is nose or tail heavy and battery location needs to be adjusted.
- 7) Adjust battery according and then repeat process 4 then 5, repeat again if needed. Once achieve neutral flight upright and inverted flight you have achieve a perfect neutral balance. Mark and use for battery location.
- 8) Test for motor mount thrust angle by a downward decent with any throttle applied, adjust accordingly or leave alone if small amount model pitches.
- 9) Laterial balancing model electronics (battery, esc and receiver location)
Recent Posts
-

Crack Yak-55 XL first build!
What do you get when you feed the popular Crack Yak after midnight? The all new Crack Yak 55 XL with …Mar 22nd 2025 -

How to Set Center of Gravity on Twisted Hobbys Rc Airplanes
A very common question we are asked of our newer pilots is how to adjust the CG on their rc airplane …Mar 22nd 2025 -

Crack Pitts XL Blog
Chris Doerr dives into this Crack Pitts XL model by Twisted Hobbys.Mar 22nd 2025